

Enemies and Bosses / Boss
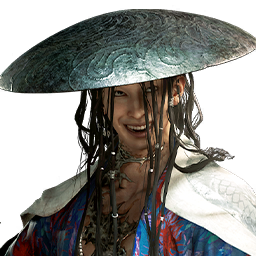
Sasaki Ganryu Boss
A swordsman in search of glory, much like Musashi himself. He was also almost as gifted, but forever fell just short of his rival. He was killed by Genma and returned to life with an Oni Gauntlet, after which he set about haunting Musashi's every move once again. After losing to Musashi at Kiyomizu-dera Temple, a mysterious white-robed man encouraged him to start killing people and stealing their souls. Drunk on the power this granted him, he finally fully lost his way. Only time will tell where the path he has chosen will take him...
- Health
- 5,000
- Maximum posture
- 7,500
- Posture regen delay
- 5 sec
- Posture break duration
- 12 sec
- Knockdown duration
- 10 sec
- Parry target speed
- 0.5x
Reference tables
5 tables
Moves and counters
Attack patterns and practical responses for recognizing the enemy's punish windows.
| Move | Pattern | Counter |
|---|---|---|
| Four-slash sequence | Chains repeated cuts and can add a tentacle follow-up. | Count the sequence and wait for the extension before punishing. |
| Step stab | Closes a short gap with a direct thrust. | Move off the center line and answer after the stab passes. |
| Wrap-around slash | Steps around Musashi before cutting. | Keep the camera centered and delay the response until he reappears. |
| Tentacle sweep | Sweeps from either side with extended reach. | Read the starting side and move away from the sweep path. |
| Tentacle rush | Uses the tentacle to drive a forward approach. | Evade laterally and punish the end of the travel. |
| Extended blade stab | A long-reaching thrust with a tentacle continuation on success. | Respect the extra reach and avoid an immediate counter after contact. |
| Sub-unit slam | Calls a secondary unit into a heavy slam. | Leave the marked impact space before returning to Ganryu. |
Guaranteed drops
Guaranteed item drops recorded for this enemy.
| Item | Amount | Chance |
|---|---|---|
| Genma Note: Sasaki Ganryu | 1 | 100% |
Where to fight
Missions whose objectives explicitly name this fight. Step numbers refer to each mission's checklist.
| Mission | Step | Fight objective | Previous objective |
|---|---|---|---|
| In the Light of an Icy Moon | 15 | Defeat Ganryu | Confront Ganryu |
| The Stage is Set at Kiyomizu | 8 | Defeat Sasaki Ganryu | Absorb the dark mass |
| To Live is to Suffer | 2 | Defeat Sasaki Ganryu | Head for Yasaka Pagoda |
Difficulty scaling range
Minimum and maximum multipliers across story checkpoints. Effective values apply those multipliers to this enemy's base health and posture.
| Difficulty | Health multiplier | Effective health | Posture multiplier | Effective posture | Attack multiplier |
|---|---|---|---|---|---|
| Easy | 0.63-1.69x | 3,150-8,450 | 0.55-1.49x | 4,125-11,175 | 0.59-1.43x |
| Standard | 0.72-1.9x | 3,600-9,500 | 0.72-1.9x | 5,400-14,250 | 0.72-1.9x |
| Hard | 1.44-3.2x | 7,200-16,000 | 1.44-3.2x | 10,800-24,000 | 1.44-3.7x |
Lore
The swordsman at the temple's summit
Sasaki Ganryu waits at the end of the climb through Kiyomizu-dera and uses the temple stage for his duel with Miyamoto Musashi. He is also known as Sasaki Kojiro. Both swordsmen carry an Oni Gauntlet.
SourcesOfficial Capcom character profilesCapcom demo overview